")
Do you want learners in your online class to see a project close up? Maybe you’re chopping vegetables for a recipe or showing drawing techniques, and you want the class to be able to see exactly what you’re demonstrating.
You can use a second camera in your virtual classroom to show close-ups of work in action, project instructions, or an example of a finished product.
While the idea of adding new tech equipment to your class may seem daunting, the process may not be as challenging as you think. Since improving your class visuals can make a big difference in your learners’ ability to follow steps and learn techniques, it’s worth taking the time to put together a multiple camera setup.
Which approach and equipment is most effective for you and your learners will depend on your individual teaching needs, but we’ll show a few options to help you get started. Read on or watch the brief video below with next steps.

Add an external camera
You can use a document camera (a device with a stable neck that can magnify objects or images for a digital screen) to show details in your online class. Or, you can add an external webcam. These can connect to your computer via a wire — typically to a USB port — or they can be wireless and use WiFi.
If you choose an external webcam, you’ll likely want a tripod to stabilize it. Some tripods have flexible necks so that you can direct the camera at the content you want to capture. Some document cameras also have a gooseneck that allows you to adjust the direction and distance of the camera.
Once you connect your camera, it’s time to decide how you’ll use it in Zoom class meetings.
Option 1: Screen share your second camera’s content
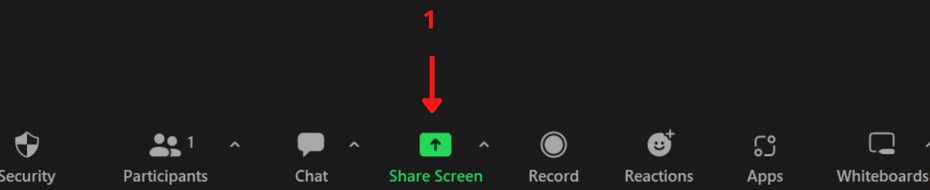
A simple approach is to continue to use your computer camera to show your face as you teach the class. To also have your second camera’s images on the screen (the one showing your project in action), you can follow these simple steps to screen share what your additional camera is capturing.
- Select the “Share Screen” option at the bottom of the Zoom window (not the up arrow next to it).
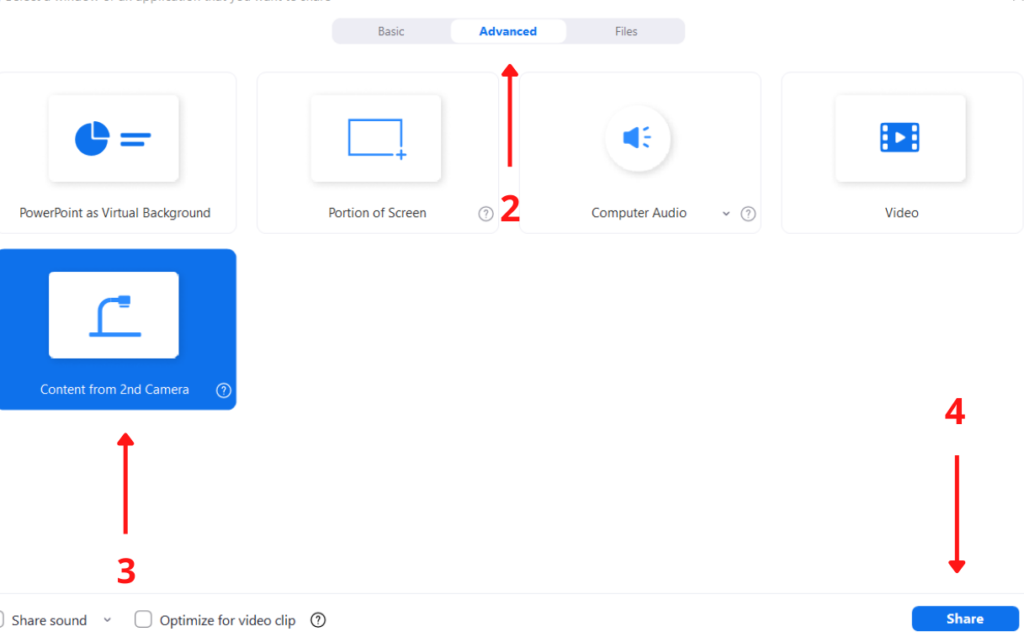
2. Select the option “Advanced” at the top of the screen.
3. Choose “Content from 2nd Camera.”
4. Hit the “Share” button in the lower right corner of the screen.
What you’re screen sharing will show up in a large window on the screen.
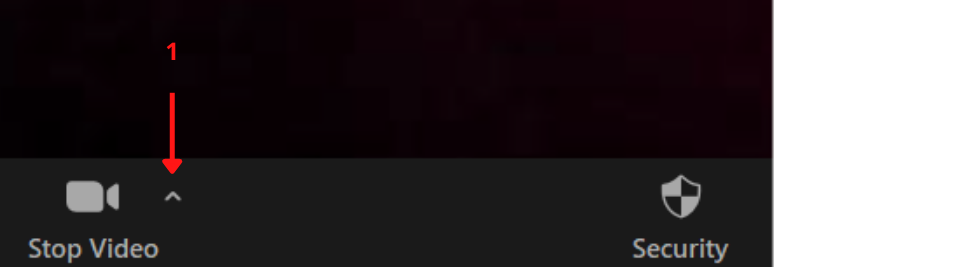
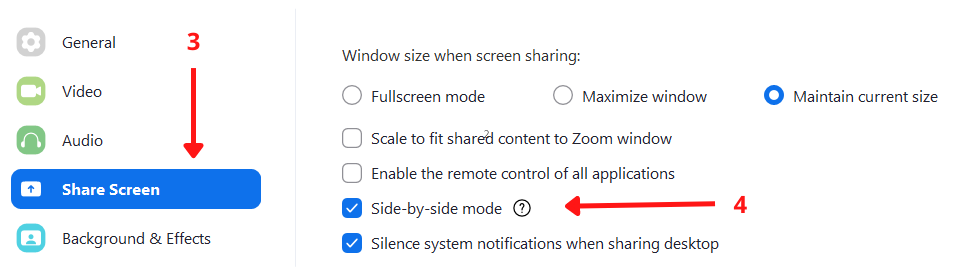
If you want to see your face in a smaller window (as well as learner faces), make sure you have your video settings set to Side-by-side mode.
- Select the up arrow next to the camera icon.
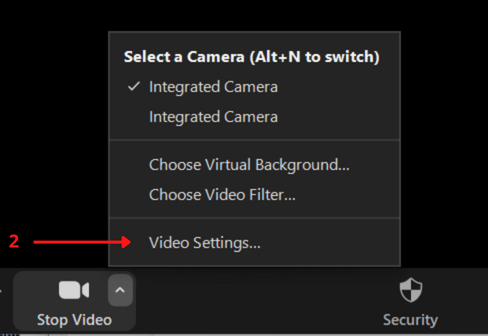
2. Choose “Video Settings.”
3. Choose the “Share Screen” button.
4. Then pick “Side-by-side mode.”
If you have a larger class (more than five learners in addition to yourself), you can adjust the visibility of your learners’ images by using Zoom’s Gallery View Grid.
Tip: If you choose this approach, don’t worry about learners seeing the side of your head as you turn to teach a skill. They can still hear your voice, and they know you’re there. This view mimics what learners might see if they were in an in-person class and watching you demonstrate an activity.
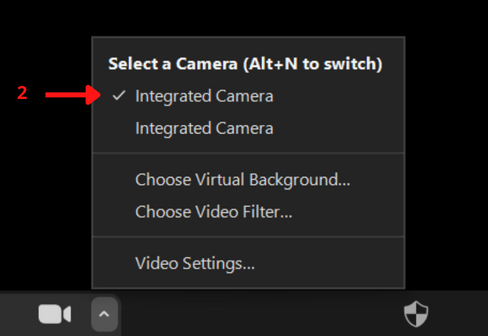
Option 2: Toggle between cameras
If you find it challenging to demonstrate on a second camera while also seeing yourself on the screen, perhaps alternating between cameras is the method for you. When you toggle between the two cameras, only one window will show at a time — either your presenter window or the second camera window. Your learners will be on screen as usual.
- To choose a camera, select the up arrow next to the video icon in the lower part of the screen.
2. When you choose this arrow, you should see both cameras under “Select a Camera.” Select either your computer camera or the second one you set up.
Log in a second time with your smartphone
If you want to use your smartphone as a second camera, you can email yourself the Zoom link and log in a second time on your phone. Now, you’ll have a presence in two places on Zoom — through your computer camera, where your face will be, and your smartphone, which is acting as an external camera.
Attach your phone to a phone holder with a clamp and flexible neck so you can move it as needed to show work in progress.
Consider connecting an additional monitor
A second monitor can give you more space to see your learners — particularly if you have a large class — and also to screen share demonstrations or instructions. If you put screen-shared content on an extra monitor, you can then see all the learners in your class on your primary device.
Try out your second camera
Whichever method you choose, plan to test your equipment and practice! It’s important to know that all your devices are working together well and to feel comfortable with your setup.
You can try out your second camera using a free personal Zoom account. Enlist a family member or friend to play the role of a student so you can see how your presentation will appear with a learner in your class. You can also test that they can see what you are showing and get that person’s feedback.
With all the elements that go into online teaching, it’s helpful to write down the basic steps to using your second camera on a sticky note posted nearby. Then, when you’re greeting learners and beginning your lesson, you have that information available until you get used to new processes.
To ask or answer questions about second camera setups and find support in managing your online teaching business, join other educators on Outschool’s Educator Hub on Facebook.
