
All live classes on Outschool take place through Zoom, a video chat platform. If you’re new to the platform and haven’t used Zoom before, don’t worry! We’re going to explore the ins and outs of using Zoom.
We’ll walk you through the most useful Zoom features and recommended settings.
Zoom set-up
Knowing how to set up your virtual classroom before your first class may help with any initial jitters. Being prepared ahead of time will also help you feel more comfortable and focused on the present. Before you teach for the first time, test out the following features by going to zoom.com/test. This will give you a chance to practice on your own in advance.
Check your settings
When you log on to Zoom, you can test your computer audio and camera settings. To start, you will need to click on “Start a meeting.” Doing so will allow you to make sure that you selected the correct microphone, headphones, and camera if you are using any external tools. Here’s a handy video on how to test your setup.
Unless otherwise specified, Zoom may automatically use your computer’s default settings.
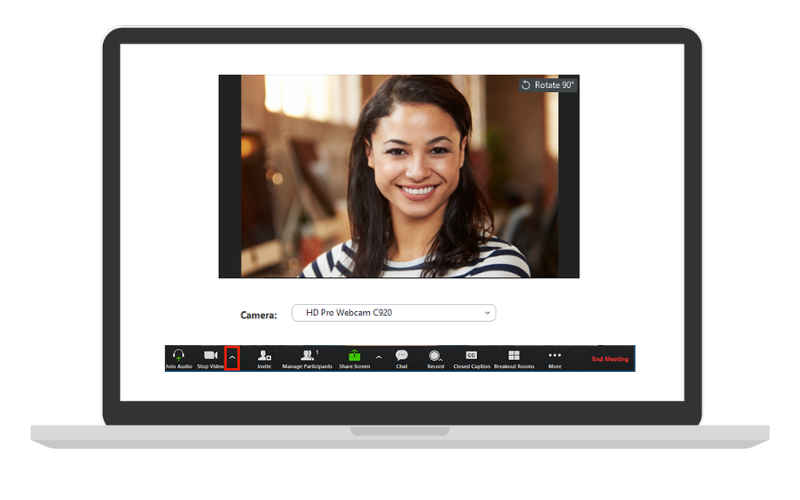
To change your settings, click on the arrow to select your chosen tools. For step-by-step instructions, read more about how to enable the audio type and camera controls.
Change your virtual background
If you don’t have a dedicated space for teaching with a professional background, you may want to change your virtual background so that learners can’t see, for instance, that unmade bed behind you! Here’s how to change your background to any image:
Step 1: Save an image you want to use as your background. Try making your own virtual background on Canva or download them directly from Zoom. You want to have your image saved and ready to go before you log into Zoom.
Step 2: Open Zoom, either during your testing session as mentioned above, or a couple of minutes before your class starts.
Step 3: Click on the carrot (^) to the right of your video button at the bottom of your screen.
Step 4: Choose “virtual background.”
Step 5: A popup should appear with the options “none” and “blur.” Since you are adding a picture, you will click on the plus (+) sign on the right-hand side of the pop-up.
Step 6: Here you can access your files and upload your video.
Step 7: Once uploaded, you can click on your image and use it during class. You can see the background in the preview image before closing out of the pop-up box.
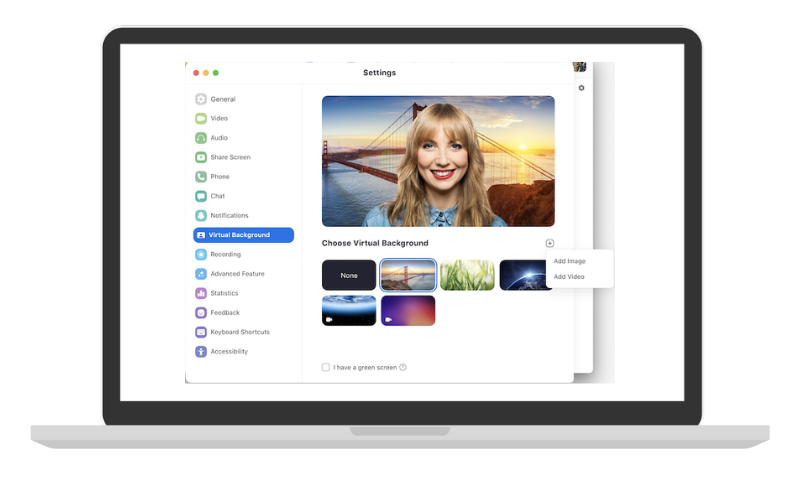
Check out Zoom’s guide for further information on virtual backgrounds.
Now that you’re all set up, let’s look at what you need to know during classes.
Classroom management
Again, being prepared helps you worry less about using Zoom, so you can keep your focus on what you’re teaching. We’ve pulled together a couple of the more common Zoom tools that can help you once the class has started.
The Waiting Room
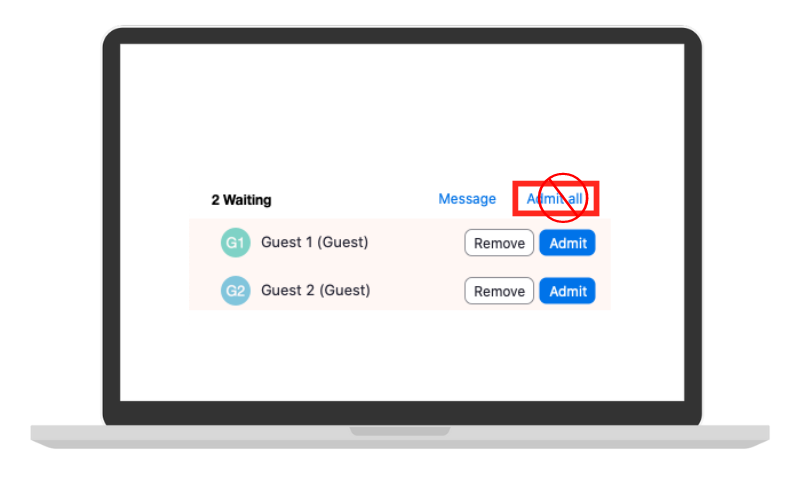
All Outschool learners will automatically be placed in the Waiting Room when they join a live class. This ensures that you have the opportunity to verify every learner’s identity before they enter the virtual classroom, as outlined in Outschool’s Learner Safety & Privacy policy.
To make sure that you’re admitting the learner who signed up for the class, it’s critical that you look at the learners’ names as shown in your Zoom waiting room and cross-check them against the learners’ names on your classroom roster.
If the waiting room names do not reasonably match with the roster names of the parent/legal guardian or learner, please use your one-way communication to ask them to change the name to the enrolled name. If you are certain that the parent’s name matches, and admit/verify the child, you should update the name on Zoom so the child’s name is seen by other participants.
If after staying in the waiting room, the listed name still does not match either the parent or child, please follow the protocols below:
Step 1: Explain the policy in the waiting room chat and tell the unknown learner that names must match their registration.
Step 2: Explain that you will check back shortly.
Step 3: If names still don’t match, explain that you cannot admit them and will follow up after class.
Step 4: Report the situation to safety@outschool.com.
As a safety precaution, you are required to individually check each learner into class and never click on “admit all” learners at once. Remember, you are responsible for ensuring learning safety by following these steps to admit learners into class.
Learners can wait here until you have your classroom set up, but be mindful to admit everyone at the appointed time.
Make sure that you are up-to-date on Outschool’s learner safety and privacy policy. For additional insight, be sure to read about the 5 steps to protecting learner safety.
Speaker and gallery view
Once learners enter the virtual classroom, you can adjust how you view everyone. At this time, there are two main options:
- Speaker View: The default option when you start a meeting, shows a large image of the active speaker.
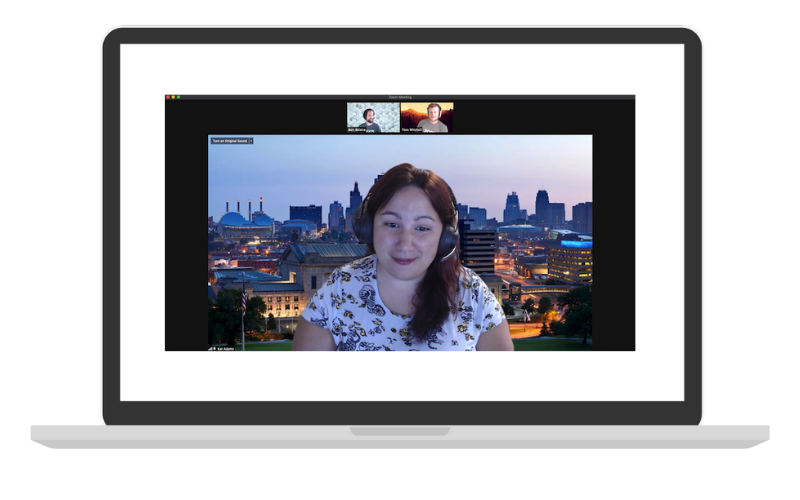
2. Gallery View: Shows all attendees at the same size.
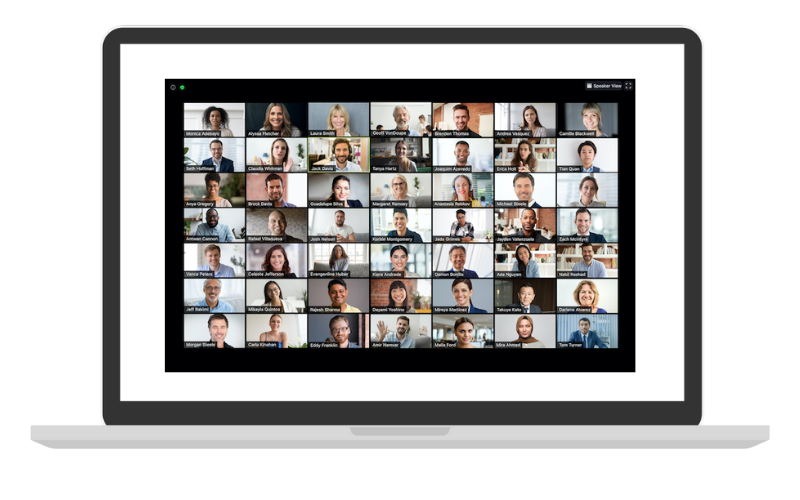
You can switch between the two modes by clicking the toggle at the top right. We recommend using the gallery view while teaching to better monitor your learners in real time. This view allows you to see everyone at once.
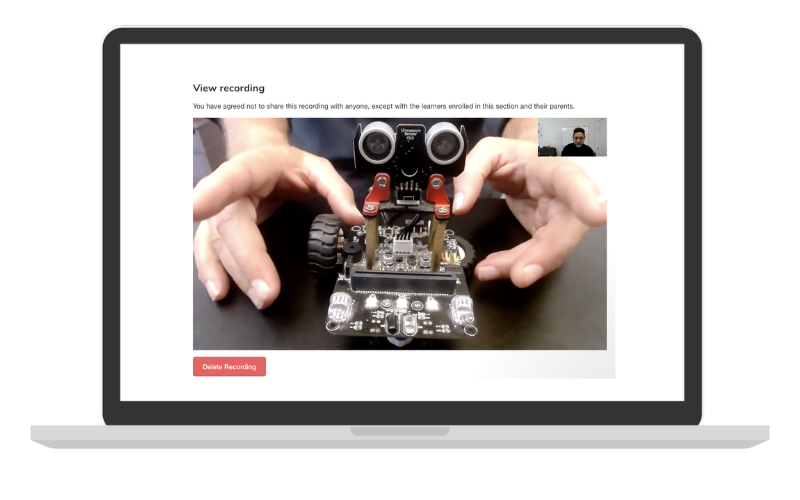
Regardless of which view you choose, if you are sharing your screen during the class, the recording will show only your shared screen in full-screen view and the active speaker in the top right, as pictured below.
For additional information on video options, be sure to read up on the following:
- Change Video Layout
- Display Options
- Recording Layouts
- Spotlighting Participant’s Video
- Pinning Participant’s Video
- Enable Dual Monitors
Also, be sure to familiarize yourself with Outschool recordings and what happens when you’re using two cameras or screen sharing.
Avoiding background noise
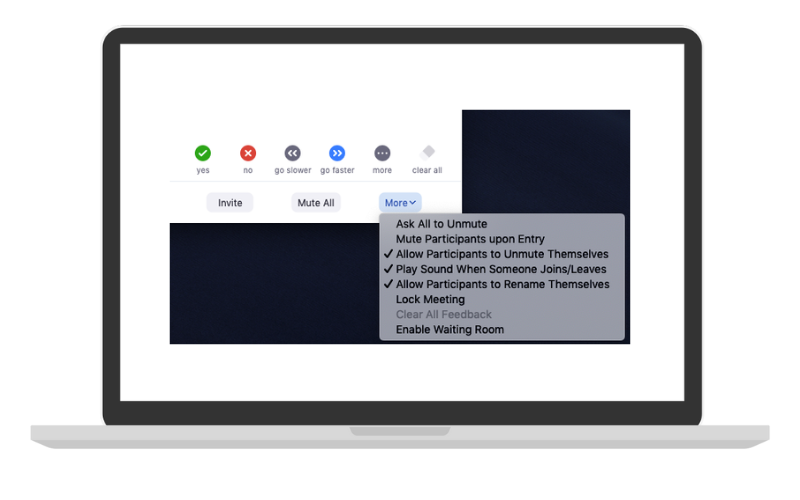
With a class full of learners, there’s a strong chance that at least one will have some kind of background noise that could be potentially distracting to others. To avoid this becoming a problem, you can always control who and when to mute. Just keep in mind that you may want to let learners know ahead of time, either in the class listing or as they enter the classroom, whether they will be expected to remain on mute when not speaking.
- Learners are able to mute themselves in the same way that you mute yourself, but as the host you also have the ability to mute all participants.
- If a learner forgets to mute themself or is too young to do so, you can mute them by hovering over their video feed in gallery mode(you’ll see a blue mute button there).
You’ll also be able to unmute the learner from the same location.
You also have the ability to suppress any noises, such as a barking dog or a crying little one from your end as well. Doing this will allow learners to hear you clearer and increases the audio quality for class recordings.
Raise Hand
Zoom offers a way for learners to digitally raise their hands. Learners can click the ‘Participants’ button (same location as your Manage Participants) to expand the participants’ panel. At the bottom of this panel, there’s a button called “Raise Hand”. Learners can use that button to get your attention while muted. To lower their hand, hover over their video feed in gallery mode.
Want even more ways to interact with your learners? Check out these reaction icons and participant controls learners can use during class time.
Disable name-changing
Some learners like to be silly in class, and that’s something we encourage (when appropriate) here at Outschool! However, we strongly recommend that you use this setting to prevent learners from changing their Zoom names for safety and privacy purposes.
On the other hand, a learner may enter class with a name that is not their own if they are using a parent’s or sibling’s device. If this is the case, verify the learner’s name, and change it when making introductions with the group.
To stop learners from changing their names during class, you will need to go to your Zoom web portal before class. This change occurs outside of the Zoom screen on the app, so once you’ve made the change, you do not have to change it again. Use the following steps to get started:
Step 1: Click on Account Management then Account Settings.
Step 2: Next, click on the Meetings tab.
Step 3: Check to see that the toggle for “Allow participants to rename themselves” is turned to “off.” If not, you can click the toggle to change the setting.
Step 4: Finally, click the lock icon to make this setting mandatory for all learners.
Learn more about how to make your class run smoothly by managing participants ahead of time and in-meeting controls.
Chat feature
One of the more talked about Zoom features in Outschool’s Educator Hub on Facebook is the chat feature. You can use the chat box, accessed from the bottom of the screen, to send messages to learners during class. Learners can also send messages to the class, which can sometimes get distracting if they are spending more time chatting with others instead of engaging in class discussions.
As the host, you control how the learners use the chat feature by selecting who they can chat with from the “More” dropdown menu. By default, group chat is enabled. You can choose to limit learners to only chat with you, the host. To disable chat completely, you should choose the “No one” option. There is not a 1-on-1 learner messaging option, so you don’t have to worry about learners privately messaging each other while you’re trying to teach.
If you’ve never used this function before, consider testing it out before class begins. You can also read up on the following resources to better understand how the chat features work:
While you’re at it, be sure to join one of our community Facebook groups to grow your network, ask questions, and get advice from fellow educator entrepreneurs.
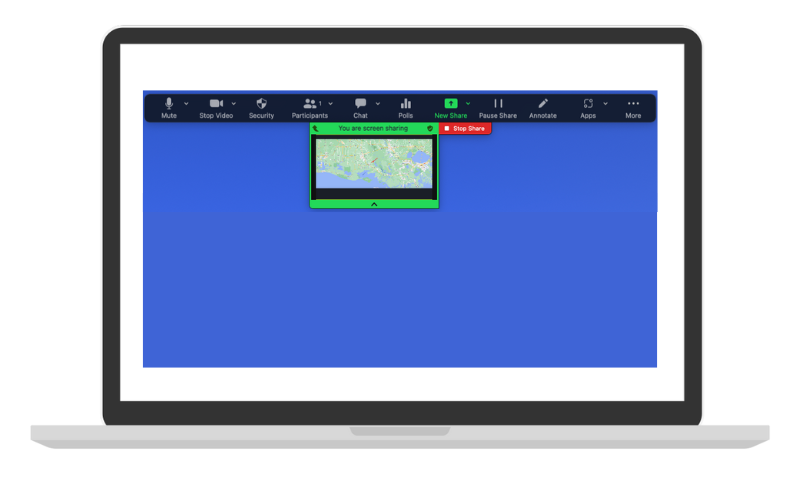
Screen sharing
Perhaps Zoom’s most useful teaching feature, screen share lets learners see what is on your computer screen. This could include a visual presentation, a website, a video, or anything else on your computer that you’re using to supplement your teaching. Zoom also includes a built-in whiteboard as a screen share option, which can be very helpful for many classes.
To share your screen, click “Share Screen” at the bottom of your Zoom window, then select the option that you wish to share. It will appear as images of what tabs are open on your screen.
Remember to check the use computer sound checkbox on the bottom left of the screen share window if you wish to share a video with learners. otherwise, the audio will register as background noise on your side and will not be sent into the video classroom.
As a best practice, ask your learners to give you a thumbs up or some indication that they can see your screen. If you chose the wrong screen or it is taking a minute to load for a learner with a slower internet connection, you will want to know before jumping into your lesson.
For more information about screen sharing, check out the following resources:
- Sharing Your Screen
- Using Dual Monitors
- Video Layout with Screen Sharing
- Giving Remote Control when Screen Sharing
- Share Presentation as Background
- Follow the Presenter’s Pointer when Screen Sharing
Please note that even if you’re screen-sharing presentations, videos, or websites they should be included in your class listing per Outschool’s third-party policy. Make sure that you’re using approved third-party tools before creating materials.
Annotation
Zoom also gives you the option to annotate while screen sharing. Doing so allows you to make your class more interactive since you can draw arrows on visuals, underline complicated words in articles, and do other helpful actions to help learners follow along with the material. You’ll see the annotation option at the top of the screen while you’re screen sharing. Learners also have access to the same annotation tools.
If you click on the ellipses (…) under “More” located on the bar at the bottom of your screen, you will have the ability to control the annotation settings. The default is that learners can annotate on your screen, however, if you want to disable learner annotation, you can click on “Disable Annotation” and prevent them from being able to write. This can be useful if the learners are using the annotation tools in a distracting manner.
Another option is to show or hide the name of whoever is annotating. If you have multiple learners annotating on your shared screen, you can hover over the annotation to see which learner created it.
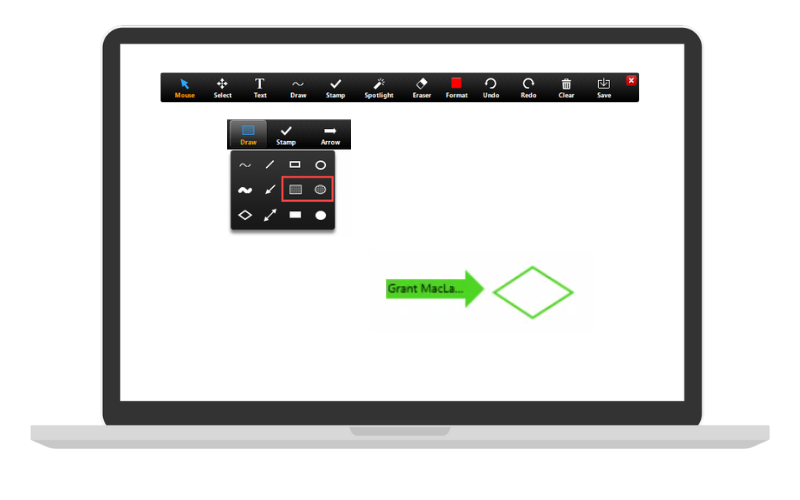
If you have a learner in class who has not annotated before, you can let them know that they can access their tools under “View Options” at the top of their screen.
Breakout rooms
Zoom provides a way for you to break learners into separate video chat rooms in order to complete discussion exercises or other group work. Breakout rooms give learners a chance to work in smaller groups and collaborate as a team. Offering learners a chance to work together is another engagement strategy that educators use during class time. Just keep in mind that you will want to check in on learners.

Want to know more about how you can use breakout rooms in your virtual classroom? Find out how with these resources:
- Getting Started with Breakout Rooms
- Managing Breakout Rooms
- Enabling Breakout Rooms
- Participating in Breakout Rooms
- Pre-Assigning Participants to Breakout Rooms
Remove a learner
from the classroom. This may be because it is not the learner who is registered for the class, the learner is outside the Outschool age range, or for a number of other safety or privacy violations. Another reason that a learner may be removed is due to behavior.
If any of these issues arise in your class, you have the option to put learners back in the Waiting Room, separate from other learners.
This will remove the learner from the meeting until you choose to bring them back in. The learner will see a blank screen with the notice “waiting for the host to let you back in.” Here, you can send a chat message letting them know why they’ve been removed from the class and set the expectations for rejoining.
If someone other than the registered learner joins the class, remove them immediately and alert Outschool’s safety team.
If you would like to learn more about managing participants and in-meeting security, be sure to read these articles:
As you can see, there is a lot you can do with Zoom! If you’re looking for additional Zoom support in and out of the classroom, be sure to check out these resources from Zoom’s help center:
- Webinar Events
- Live Training
- Joining & Configuring Audio & Video
- Meeting Controls
- Zoom Room Features – Per Device
- How Much Bandwidth do You Need
- Setting Up a Test Room with Zoom
- Virtual Backgrounds
- Waiting Rooms
- Hot Keys & Keyboard Commands
Outschool also has some amazing Zoom resources for you in our Educator Library:
