
How you appear on screen makes a huge difference for your learners’ class experience. Think about a time when you’ve attended a video call or presentation and the speaker’s video feed was grainy, dark, or hard to hear. Was it easy to stay engaged? Did you feel frustrated trying to see or listen to what was going on? Were you tempted to hit “Leave Meeting”? These are all emotions your learners can feel, too, if your video is subpar during class.
Follow these 4 tips to create a bright and welcoming on-screen presence with proper lighting, helpful technology, and an intentional background.
1. Set up lighting for online teaching
Start off by illuminating your face and your classroom background. While there are plenty of lighting options out there, the basic principle is always the same: Your light source should come from behind your camera and shine onto your face.
If you have access to natural lighting from a large window, sunlight will almost always give you your best look on screen. Just remember to arrange your blinds or curtains, so you don’t see any shadows on your face.
If you don’t get much natural light where you teach, there are a few options for artificial light.
- Invest in a ring light or something similar intended for taking videos and photos from home. Here are some ring lights teachers love.
- Place a tall floor lamp or desk lamp behind your camera if new lighting isn’t in the budget right now. Remember that diffused white lighting is ideal; some warm incandescent bulbs can add a yellowish tint to your video and affect the colors learners see in your presentations.
- Go even bigger and enhance your space with a larger or more permanent LED light system (a good option if you teach often and have a dedicated space where you can install lighting).
Pro tip: If you wear glasses or have anything reflective in your video frame, you may need to experiment with different angles to avoid glare from your lighting or your computer screen. Set up a test Zoom meeting and play around until you get it right!
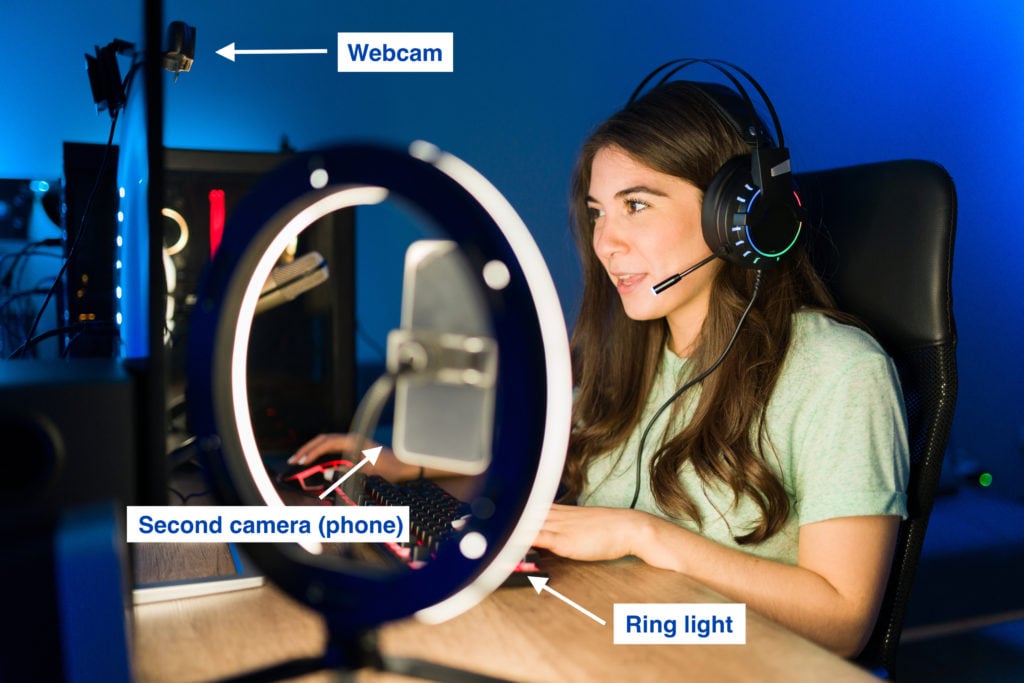
2. Choose the right camera(s)
While using your laptop camera for teaching is a fine place to start, many educators find that a technology upgrade can really make a difference in their enrollments and class experience.
Teaching with a professional webcam or multi-camera setup can help your on-screen image appear crisp, clean, and – well – professional. Many webcams clip right onto your monitor or laptop, and some need a simple tripod to sit on your desk. We go over a few camera set-up options in this post (including using phones and document cameras for extra video feeds).
When choosing a webcam, look for the one that most matches your needs. Do you need one that operates on battery power? Swivels in different directions? Clips onto a laptop? Check out this list of popular webcams to get started.
The image below shows an advanced set-up that includes all the bells and whistles, including multiple cameras and monitors.
3. Make sure learners can hear every word
Not hearing or understanding what you’re saying can be a significant turn-off for families. To make yourself stand out, take extra steps to ensure learners can hear your voice – and not hear distracting background noise.
Pick a place to teach where you can have reasonable quiet and privacy during class. Avoid situations where dogs barking, kids playing, or sirens blaring could easily interrupt your instruction (this may mean always shutting a door or window in case of unexpected noises). You could opt for a microphone or headset that includes background noise cancelling for extra assurance that background sounds won’t interfere with your teaching. More on mics and headsets here.
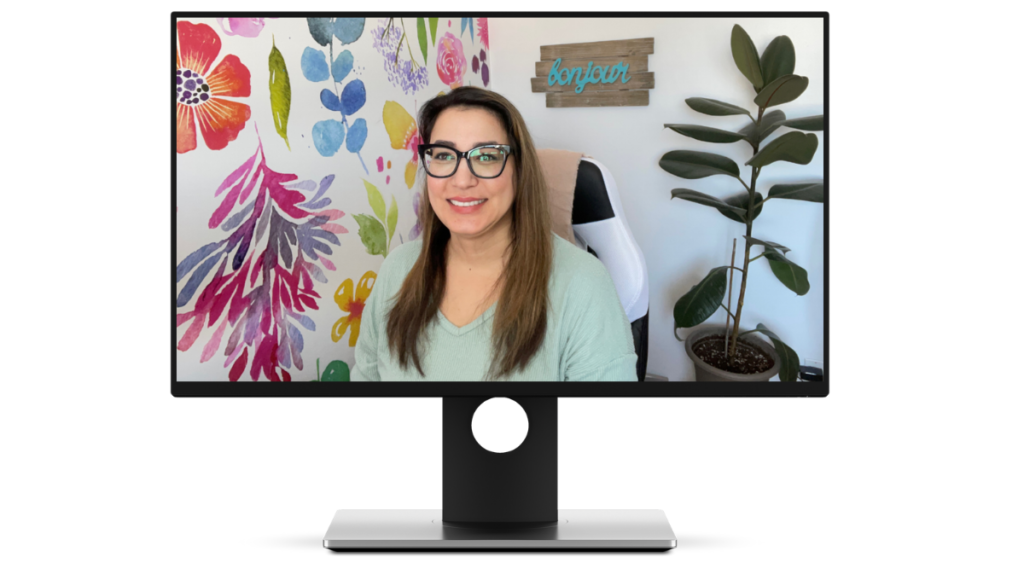
4. Create an engaging virtual classroom background
Make what learners see behind you memorable, professional, and connected to your class experience. Creating an interesting video background – instead of setting up in front of a blank wall – can actually help kids remain focused on your screen while you give instruction. You may also find it’s a great way to build brand awareness on Outschool and help your class stick in families’ minds.
Think about in-person school classrooms; they’re often filled with colorful posters, sayings, and decorations. These decorations help teachers create an atmosphere for learning, and you can do the same thing online by redesigning your physical teaching space or using a green screen.
If you always teach from the same location, how could you transform the are around you to really reflect what you want learners’ experience to be in your class? Consider making these changes:
- Add pictures, posters, and objects that reflect your brand or what you teach.
- Keep class materials that learners recognize on a table or shelf behind you. For example: If you know that your learners love the Mr. Waffles puppet, have Mr. Waffles up on a shelf behind you. Keeping him in view can build excitement for Mr. Waffles’ appearance in class and bring up great memories for returning learners.
- Use simple features like plants, tapestries, or art to create atmosphere. Adding any pop of color or object to focus on can help kids stay engaged when they feel like their attention is wandering.
If you aren’t able to make physical changes to the place you teach from, some educators recommend using a portable green screen like this. You can take it out when it’s time to teach and store it away when you’re done.
Why bother with a green screen when Zoom can already add a background to your video? Using a green screen keeps your image crisp and helps Zoom avoid glitches when using the virtual background feature.
When selecting a virtual background, give it the same attention as you would a physical space! You can even create a custom background using free online design tools like Canva that matches your personality, brand, or class topic.
Time to prioritize and get to work
If you’re ready to create a more professional, engaging look for your virtual classroom, start by prioritizing your biggest needs. Better lighting? A new or additional webcam? A green screen or background makeover? Take it step by step until you’ve perfected your on-screen presence.
And remember – these guidelines can help you not only create a better live classroom but produce excellent course videos and an outstanding profile introduction video that sparks enrollments and showcases your personality. Get video recording tips here.
